Reference Board for Aseprite
A downloadable Reference Board
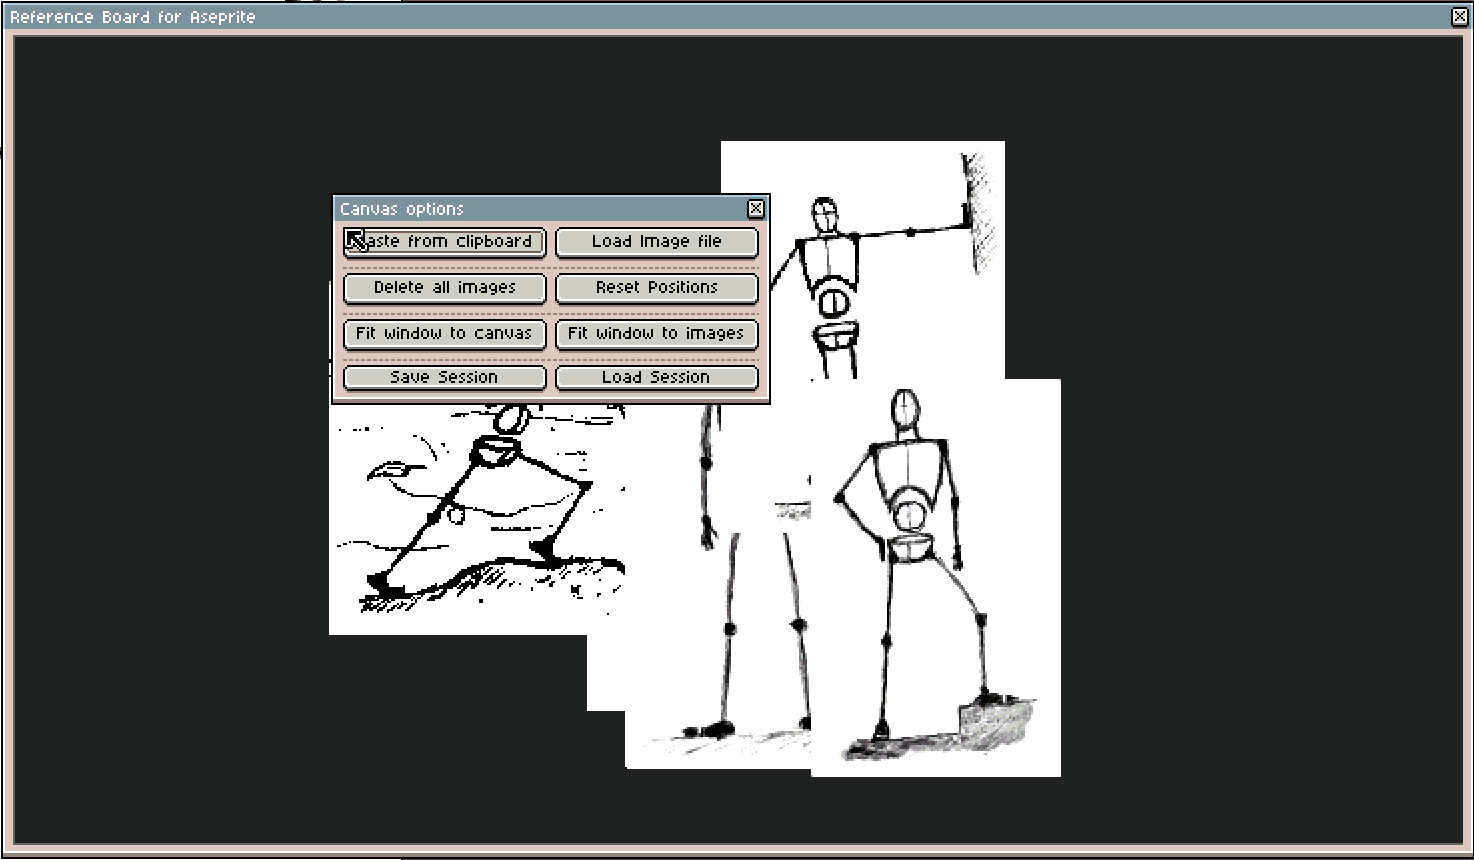
What is Reference Board for Aseprite?
Reference Board for Aseprite is an extension that adds a floating reference board to your Aseprite workspace. Instead of juggling external windows, separate apps, layers or extra sprites, you can keep all your reference images inside Aseprite while you paint. The goal is to make reference handling faster, clearer, and more integrated into the drawing process, feeling like a natural part of the drawing environment rather than an external process
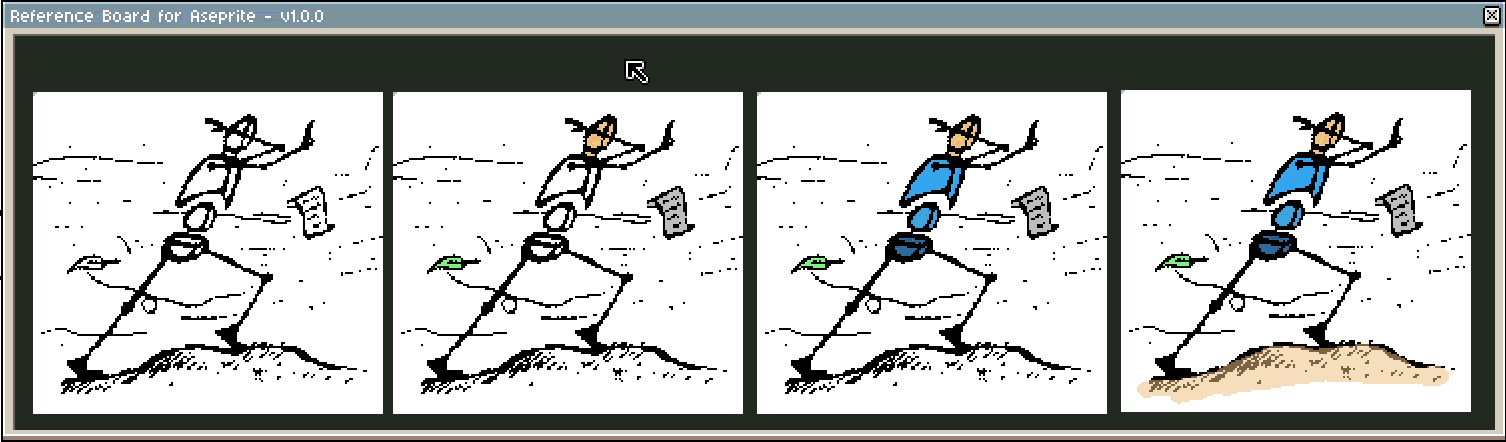
Use it for concept art, screenshots, palettes, previous sprites, animation frames or any image you want to keep an eye on while working.
A free demo version with limitations is available for anyone who wants to try the workflow before purchasing.
Key features
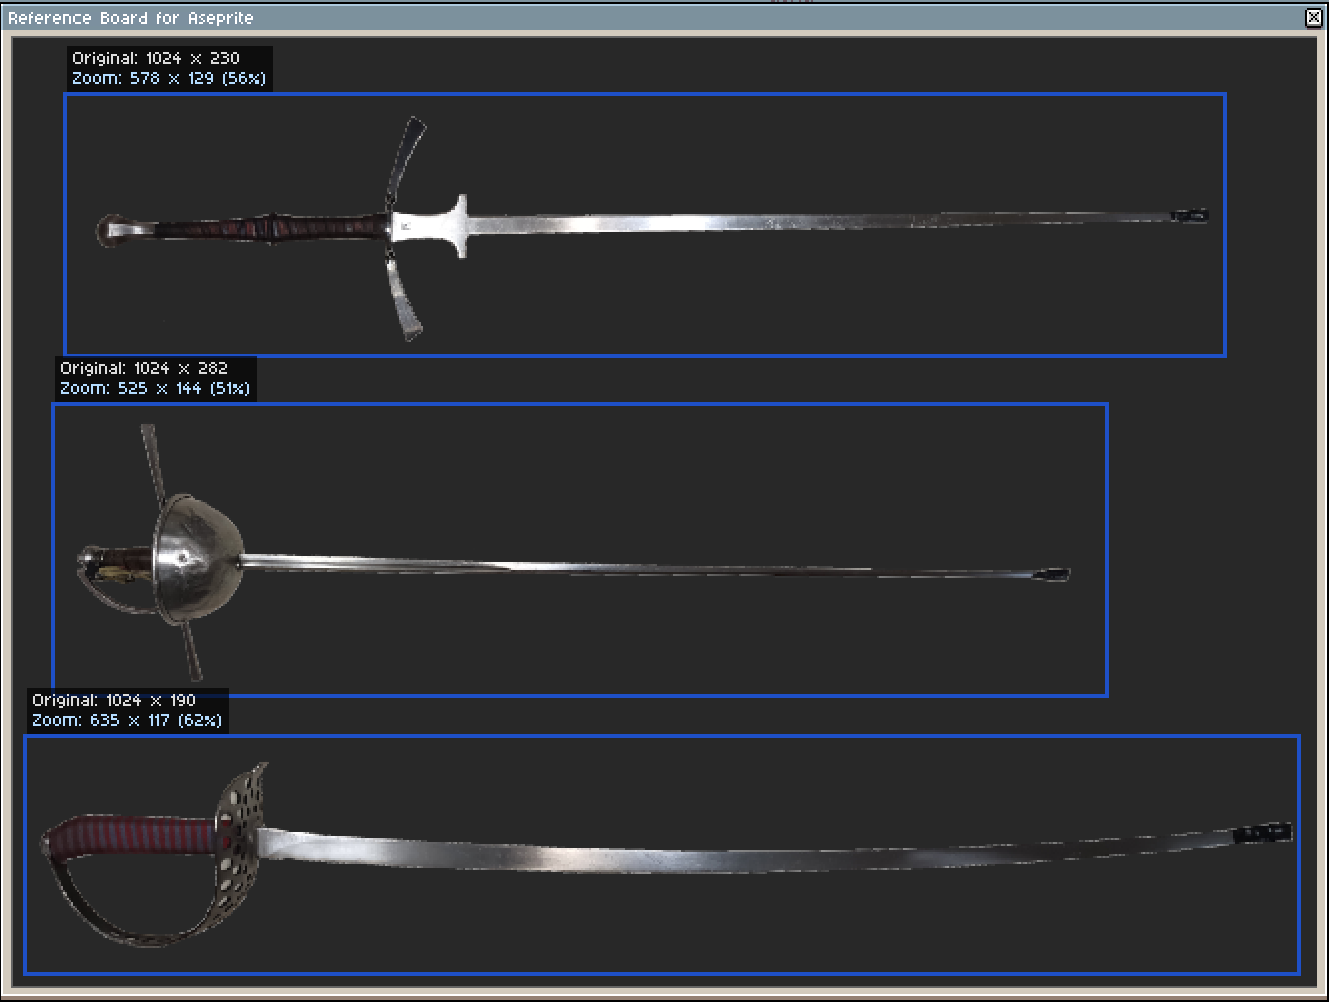
- Load multiple images. Import several reference images (PNG, JPG, etc.) into a single window and keep them visible while you work.
- Paste from clipboard. Grab references directly from your browser, your image editor or any other app and paste them into the board.
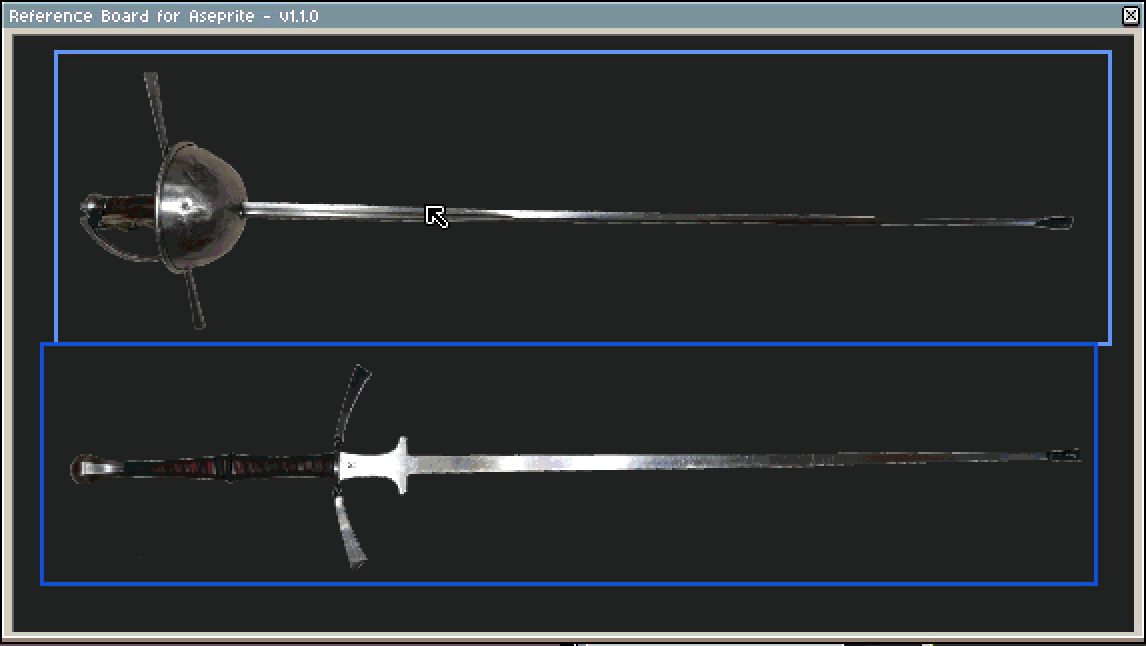
- Organize your board. Move and reorder images, select multiple images at once, and arrange your board to match your current task.
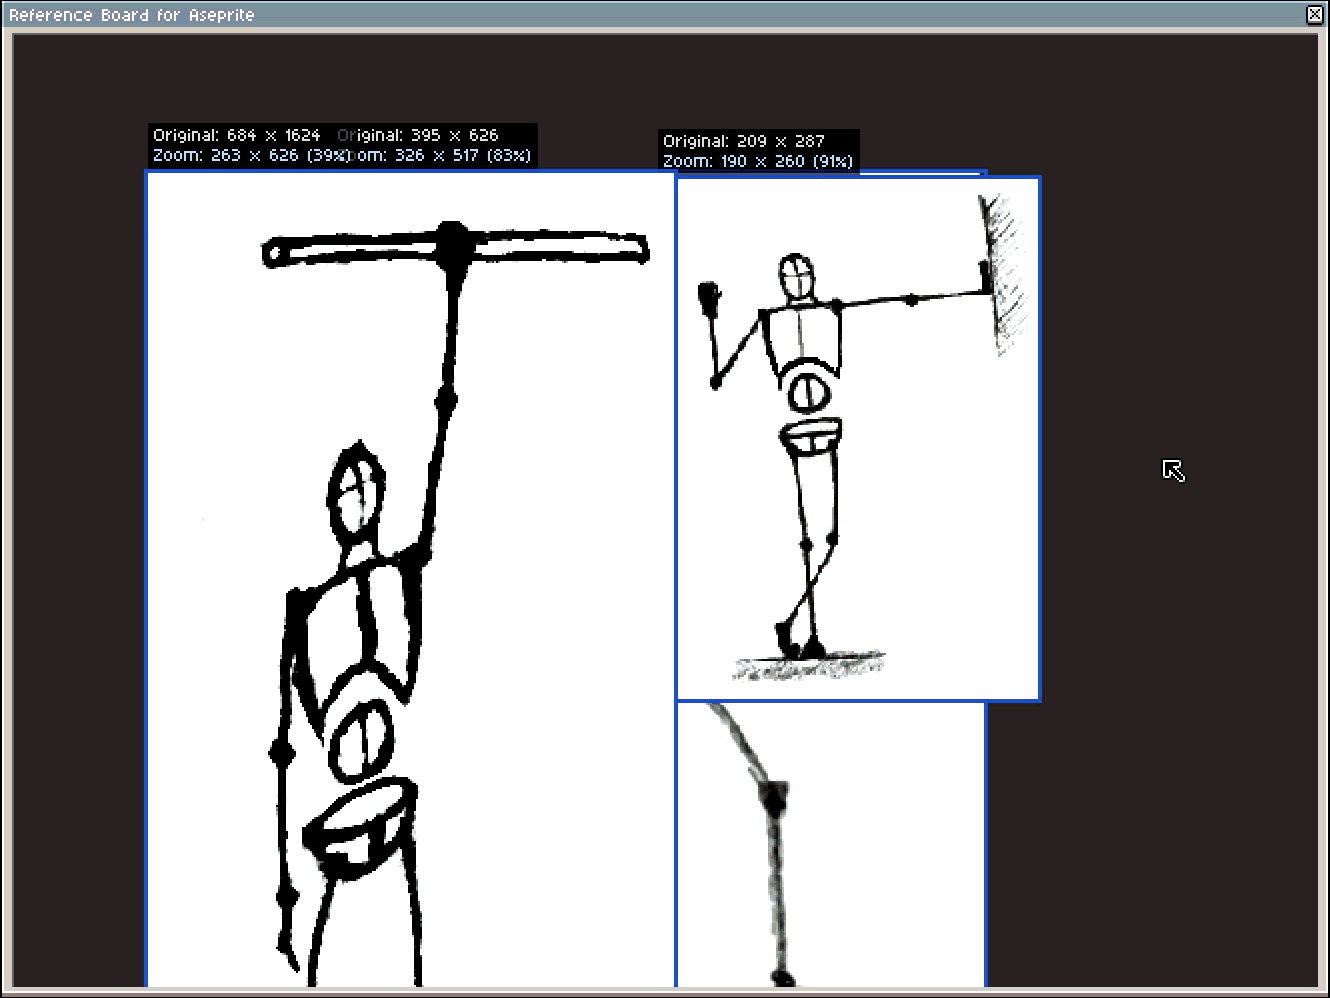
- Per‑image zoom and pan. Zoom into details on a specific reference without changing the zoom of your Aseprite canvas.
- Clean up in quickly. Delete images you no longer need to stay focused on your current idea.
- Delete all images.
- Delete only the selected images.
- Save & load sessions. Save your current reference board and reload it later, so each project can have its own set of references ready to go.
- Image transformations: flip horizontally and vertically, rotate 90 degrees, change transparency.
- Adjust automatically:
- Fit window to the canvas.
- Fit window to the images size.
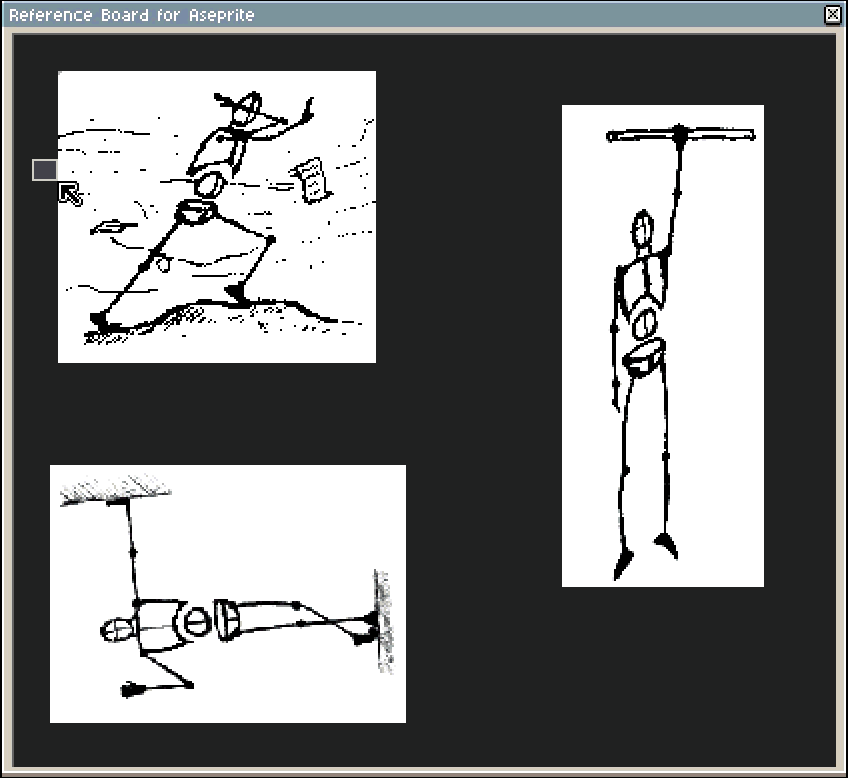
- Reset image positions.
- Paste back into Aseprite. Send any reference image (original image or image modified with image transformations) back to Aseprite as:
- A new sprite.
- A new layer on your current sprite.
- Get active sprite or active layer. It is possible to paste the active sprite or active layer on the reference board. Compatible with TileMapLayer and Layer Groups.
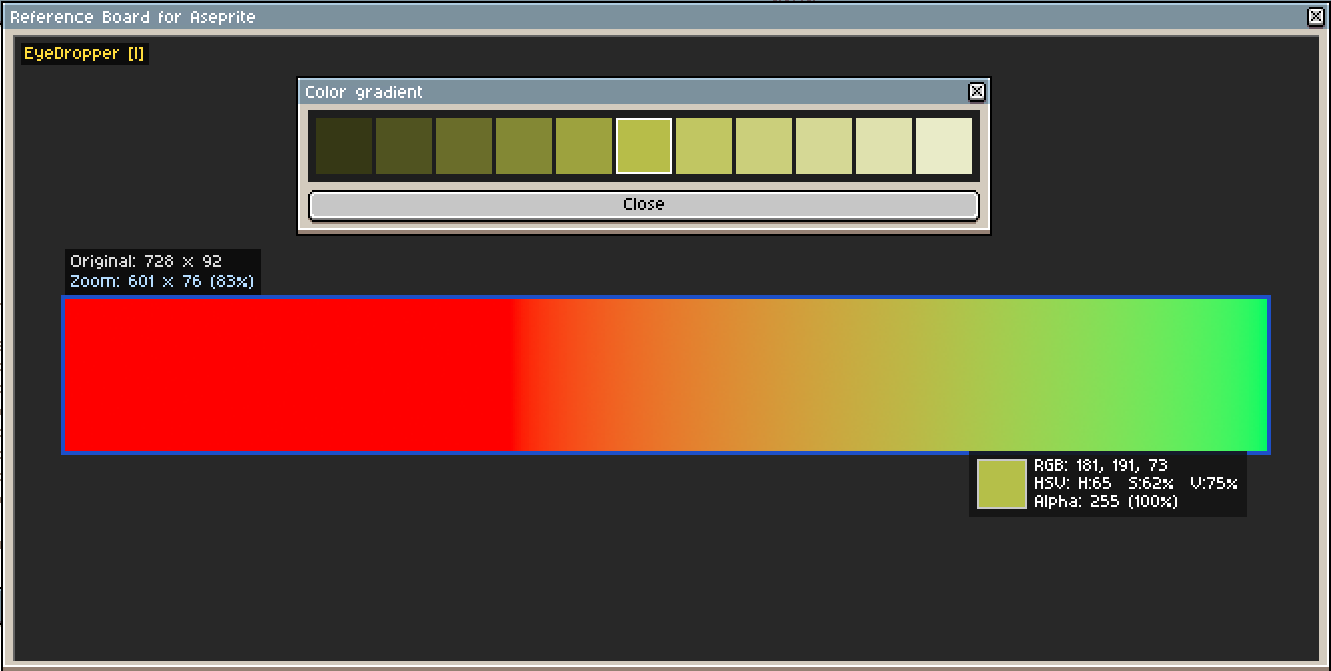
- Eyedropper tool, showing RGB and HSV information..
- Pick a colour (foreground or background) from the Reference Board.
- Show a gradient by double clicking on the colour.
- Create notes. You can create notes linked to an image or independent.
- Configurable grid system. With snap to grid functionality.
- Shortcuts for accessing quickly to the functionalities.
Who is it for?
- Pixel artists working from concept art or moodboards that work with multiple references.
- Game devs who iterate on sprites while looking at screenshots or level mockups.
- Animators who want to keep previous frames, poses or timing charts visible as they work.
- Users who want to avoid constantly switching between applications.
- Anyone who keeps a second monitor or image viewer open just for references.
If you’ve ever done that, this tool is for you.
Download and price
Reference Board for Aseprite is a paid extension, available as a one‑time purchase of 5$.
A free demo with basic functionality is currently available. The demo allow you to test the full reference workflow, with a few intentional limitations aimed at non‑professional use and for trying out the tool before purchasing. You can:
- Keep references visible while working in the editor.
- Move and organize them freely.
- Zoom each image independently.
- Adjust window to canvas and to images.
- Paste a reference to Aseprite editor as a new sprite.
Demo limitations:
- You can add to the board up to 3 images.
- There is no save and load sessions.
- No advanced features.
The table below shows a full comparison between the demo characteristics and the full version.
| Functionality | Demo | Full version |
| Persistent floating window | ✔ | ✔ |
| Does not block the editor | ✔ | ✔ |
| Multiple format loading | ✔ | ✔ |
| Paste from clipboard | ✔ | ✔ |
| Move and organize references | ✔ | ✔ |
| Multiple selection | ✔ | ✔ |
| Independent zoom per image | ✔ | ✔ |
| Number of active references | Max 3 | Unlimited |
| Import as new sprite | ✔ | ✔ |
| Import as new layer | ✖ | ✔ |
| Sessions saving and loading | ✖ | ✔ |
| Get active layer or sprite layer | ✖ | ✔ |
| Shortcuts | ✖ | ✔ |
| Colour picker (Eyedropper tool) | ✖ | ✔ |
| Create notes | ✖ | ✔ |
| Grid system | ✖ | ✔ |
| Advanced features | ✖ | ✔ |
| Continuous professional use | ✖ | ✔ |
| Future updates | ✖ | ✔ |
Getting Started With Reference Board for Aseprite:
Requirements
The extension has been tested on Aseprite v1.3.16 but it should work in versions 1.3+.
The Operative System tested and in which the software was developed was Windows 11, but it should work also in Windows 10.
If there are any bugs regarding the version of Aseprite or the Operative System, contact me to provide support.
Installation
- You can install the extension from the settings menu in Edit > Preferences > Extensions.
- You can also install and update by simply dragging and dropping the extension file into Aseprite.
- You can enable and disable the extension also from the Extensions menu mentioned before.
- Update the extension just need to do one of the steps above.
Once installed you will find a "Reference Board for Aseprite" submenu under the View menu. You can activate the board or the options dialog.

When you start working, Aseprite will show you a popup prompt requesting permissions for the script to function correctly. These permissions are required for accessing the clipboard when you paste images to the reference board and for managing the sessions (save and load session files) in the full version.
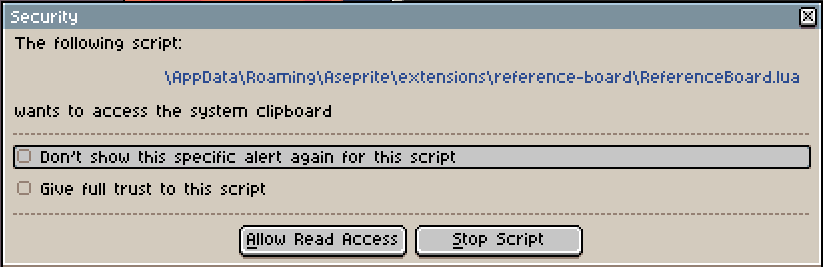
To ensure the extension works properly without interruption, you should select the checkbox labeled "Give full trust to this script" and click "Give Script Full Access". This only needs to be done once, in order to prevent all popup requests.
Usage
Full commercial version
Right-clicking on the canvas displays a menu, with different options:
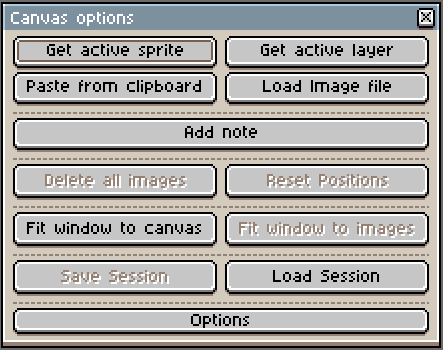
- You can get the active sprite with all the visible layers displayed by pressing "Get active sprite".
- You can get the active layer by pressing "Get active layer". It is compatible with a TileMapLayer type and with groups, getting all the layers as one image within the group.
- You can load images from a file or paste them from the clipboard. A list of last 10 images loaded will be displayed on the load image dialog.
- Add note creates an independent note.
- "Delete All Images" allows you to clean the board, with a previous confirmation in case you pressed wrong.
- The window can be adjusted to the canvas size or the space occupied by the images.
- "Reset positions" can be used to put all the images in a line, alongside top of the window.
- You can load and save sessions. The saving functionality works as follows:
- The information is stored in a text file with .refboard as extension.
- The images will be stored in a subfolder named as the session file, names image_1, image_2....
- The load and save dialog box will display a list of the last 10 sessions.
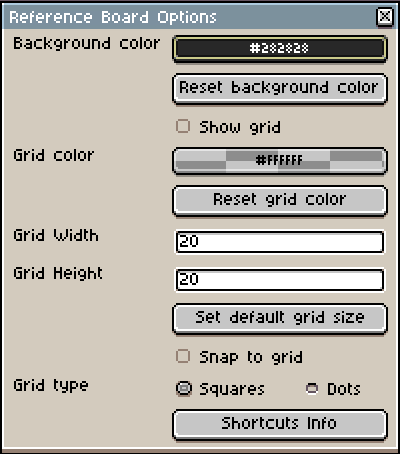
- "Options" shows a dialog to customize the extension. The new dialog can be activated using the "Canvas Menu" or a new submenu from the View group in Aseprite. Within the options window, a background color can be selected, which is saved in the session file, or you can get back to the default background color. The grid system can also be configured. You can also see the shortcuts information.
Please note that overwriting a session will overwrite the images, and the images are stored with mirroring and rotating modifications, but the original resolution is not affected.
The image from a file will also be stored in the folder, so the original file will not be affected.
"Shortcuts info" button provides information about shortcuts available.
Right-clicking on the images also displays a menu.
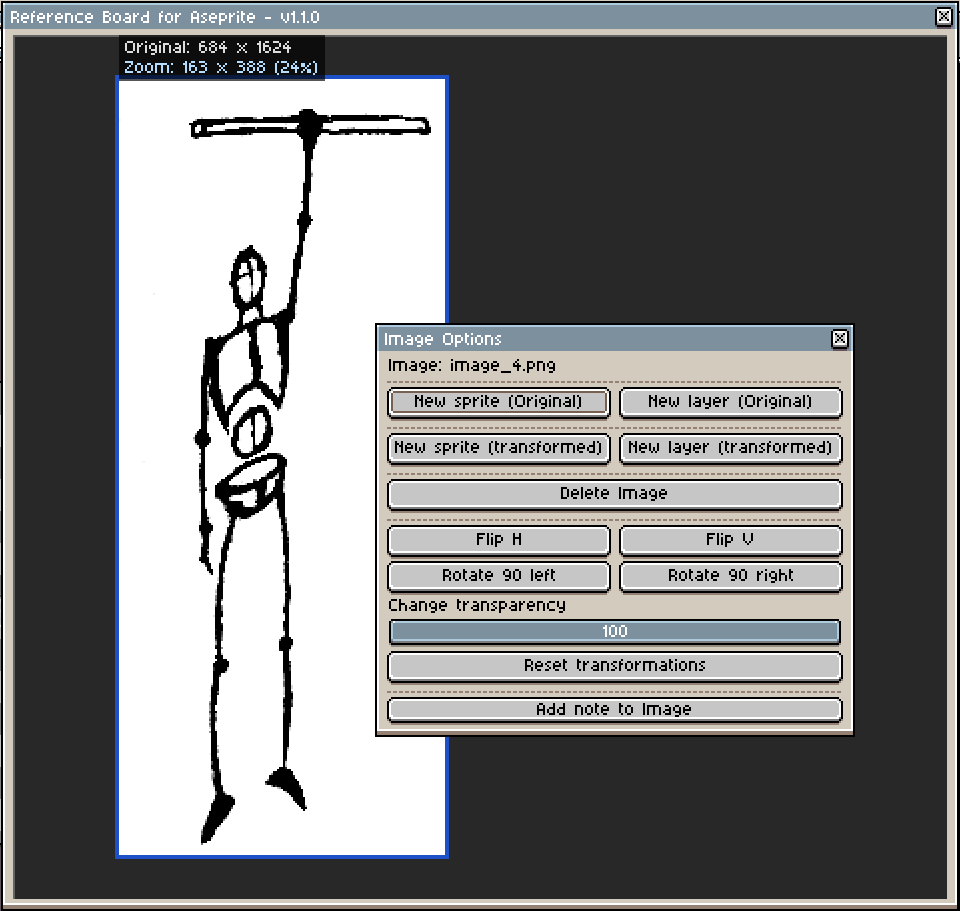
- You can paste the image as a new sprite or a new layer.
- You can choose to paste the original image (without transformations during the current session).
- You can choose to paste the image transformed (rotation, mirroring or zoom). Please note that changing the zoom changes the resolution of the transformed image.
- The original resolution and the transformed one is displayed by default at the top-left of the the image.
- You can delete the image or images selected.
- You can transform the reference: flip horizontally and vertically, rotate 90 degreees and change transparency.
- You can reset the transformations applied (excluding the zoom).
- You can add a note linked to the image.
Please, note that the "Paste", "Delete", "Image Transformations" and "Add note to Image" buttons will apply the function to all images selected. So, if there are 4 images selected, and you press "Delete image", the four images will be removed from the reference board.
Functionalities:
- You can zoom in and zoom out using the mouse wheel over each image. Please note that changing the zoom changes the resolution of the transformed image.
- You can select more than one image by dragging and moving the mouse with left button. The images selected are surrounded with a dark blue square, meanwhile if you just hover over them, the square is light blue.
- You can add or remove an image from a selection by pressing Ctrl and clicking on image.
- You can move the image or images by dragging and pressing the left mouse button.
- All the images can be moved simultaneously by dragging the wheel button. It does not matter if there are images selected or not to use this feature.
- If you have selected more than one image and press Ctrl + mouse wheel, the zoom is applied to all the selected images.
- "Eyedropper mode". Pressing the I key with focus on the reference board will activate the "Eyedropper mode". In this mode, clicking with the left mouse button will pick the colour as foreground colour, and the clicking the right mouse button will pick the colour as background colour. Moving the mouse will show RGB, HSV and alpha colour info.
- Double clicking in this mode will show a popup with a gradation of the colour clicked. This window can be moved whatever you want and the colours can be selected in the same way. More colour info can be added in future updates if users want it.
- Image transformations using the image menu as mentioned before.
- Notes:
- Notes can be independent (canva menu) or linked to an image (image menu). Shortcut Ctrl + N can be used too.
- You can choose different colors for your notes.
- The notes can be deleted with Delete or Backspace key.
- To edit a note, double-click on it.
- If you move an image with notes linked, the notes are moving with the image, even when zooming.
- Grid system:
- Two display modes: dots and lines.
- Adjustable grid size, both horizontal and vertical.
- Snap to grid functionality.
- Toggle snap to grid and grid visibility on/off, using shortcuts or the options menu.
Shortcuts:
You can use shortcuts for speeding up the things, but remember that the extension will stop the key propagation when pressing Ctrl, Alt, Supr, Backspace and I keys to Aseprite main editor when reference board is focused. Therefore, the shortcut by default for showing/hiding the reference board is use Shift + F10. (The best option for using this shortcut is use Shift + Fn). The shortcuts are:
- Ctrl + O: Load Session dialog.
- Ctrl + S: Save Session dialog.
- Ctrl + V: paste the image.
- Ctrl + A: Select all the images.
- Ctrl + I: Showing/hiding resolution information at the top-left of the image.
- Ctrl + N: Creates a note.
- Ctrl + G: Show/Hide grid.
- Ctrl + Alt + G: Enable/disable "Snap to grid".
- Delete or Backspace: delete the selected images.
- Esc: Deselect all the images.
- I: Eyedropper mode.
- Holding down Alt: Eyedropper temporary mode.
- Holding down Mouse Wheel + Mouse move: Move all images.
- Ctrl + Mouse Wheel: Zoom to all selected images.
Demo
The core reference workflow and the basic usage is fully functional in the demo, but many features are intentionally limited, including save and load sessions and advanced functionalities that are included in the commercial version. These limitations are there to keep the demo focused on evaluation and not professional use rather than long-term use. You can:
- Keep references visible while working in the editor.
- Load up to 3 reference images.
- Move and organize them freely.
- Zoom each image independently.
- Adjust window to canvas and to images.
- Paste a reference to Aseprite editor as a new sprite.
Some buttons are not enabled, as they are intended for use only in the full version. So, a button "About demo version" has been added for explaining in a summarize way the differences between the full version and the demo one.
Indeed, the commercial version have more buttons and advanced functionalities.
Support
If you find this tool useful and it helps you in your workflow, please consider rating it. You will be supporting it and enabling the development of new tools.
On the other hand, if you have ideas that would make this tool more useful in your workflow, or missing features you’d expect in a reference tool, feel free to share them in the comments or on the Aseprite community thread.
Please report any bugs if you find and I will try to resolve as soon as possible!
Thanks for reading! If you try it, I’d love to hear how it fits into your workflow.
Thank you!
Changelog
- v1.0.0. -> First version.
- v1.1.0:
- Add notes creation support.
- You can add or remove an image from a selection by pressing Ctrl and clicking on image.
- v1.2.0:
- Import the active sprite directly into the reference board using canvas menu.
- Import the active layer (including layers inside groups and TileMapLayer).
- New Options window (centralized settings + shortcuts).
- Custom background color, saved with sessions.
- v1.3.0:
- Grid system added.
- Two display modes: dots and lines.
- Adjustable size.
- Customizable color.
- Snap to grid functionality.
- Grid system added.
Roadmap (subject to feedback)
- Demo version scheduled for release on February 27th. -> Done earlier, on March 25th.
- Full version scheduled for release on March 4th. -> Done
- Improve and add new functionality after the first release based on user feedback, including for example:
- Better layout options for images (automatic grids, snapping, etc.).
- Additional tools for the images.
- Optional notes per image (pose name, palette info, etc.). -> Done
In addition, I plan to:
- Keep the extension compatible with future Aseprite versions as far as the API allows.
- Add quality‑of‑life tweaks and new options based on real use cases.
- Provide support.
Reference Board for Aseprite License Agreement
By downloading, installing, copying, accessing, or using the Software, you agree to be bound by the terms of this Agreement. If you do not agree to these terms, do not install or use the Software:
- Ownership: You are buying a license to use the software, not ownership of the software itself. All rights, title, and interest in and to the Software, including but not limited to code, design, structure and functionality are and shall remain the exclusive property of Ciudadano-V.
- What you CAN do:
- Use the software for personal or commercial creative work.
- Install it on your own devices.
- Modify it privately for your own personal use (no sharing).
- What you CANNOT do:
- Share, upload, sell, or redistribute the software in any form.
- Distribute modified versions.
- Remove copyright or license notices.
- Attribution is not required for normal use of the Software in creative works but is appreciated. You may not represent the Software as your own work.
- Modifications: You may modify the Software for private personal use only, provided that:
- Modified versions are not distributed, shared, or published.
- Modifications do not remove ownership or license notices.
- You may NOT distribute modified or derivative versions of the Software under any circumstances without explicit written permission from Ciudadano-V.
- Demo version. If you are using the demo version:
- Functionality is restricted.
- Upgrade is required for full functionality.
- All restrictions are part of the licensed Software and must not be bypassed.
- Liability: The Software is provided “AS IS”, without warranty of any kind, express or implied. The creator is not responsible for damages, data loss, or other issues resulting from use of the software. Although the extension is not intended to cause damage, no warranty is provided. Remember to save your work regularly.
- Ciudadano-V reserves the right to revise this license as necessary. Revisions only apply to new downloads or updates and do not retroactively alter the terms for previous users.
Simple Usage License / Rights © Ciudadano-V 2026. All Rights Reserved.
Purchase
In order to download this Reference Board you must purchase it at or above the minimum price of $5 USD. You will get access to the following files:
Download demo
Development log
- Update - v1.3.0 - Grid and Snap to Grid implementation21 days ago
- Update - v1.2.0 - Active sprite/layer import + Options window36 days ago
- Update - v 1.1.0 - Notes support added.51 days ago
- Release — Reference Board for Aseprite v1.0.058 days ago
- Public Demo now Available — Reference Board for Aseprite65 days ago
- Reference Board for Aseprite presentation72 days ago